Mold Removal Basics

Mold Removal Bronx NY professional will evaluate the extent of the problem and inspect for hidden mold. They will also test air quality and identify the type of mold present.

During the cleaning process, non-porous surfaces will be wiped down with biocide and scrubbed to kill spores. Mold-damaged porous materials will be bagged and carried away to prevent spores from settling elsewhere.

Mold Removal

1. Cleaning

Mold is not just unsightly, but it can also pose health risks. Inhaling mold spores can trigger allergies, asthma, and even fungal infections. For these reasons, you should never ignore any visible mold spores. In fact, if you spot any mold growing in your home, it is important to start cleaning immediately.

First, you need to examine the extent of the mold. This involves determining how much surface area is affected and the type of mold. This will help you determine the appropriate method of removal and remediation.

In general, most molds can be removed using a combination of vinegar and detergent. To clean a contaminated surface, add a solution that’s equal parts white vinegar and water to a spray bottle. Apply the solution to the moldy surface and scrub it. If the area is large, use a brush with a long handle. Once the surface is clean, rinse it with clean water. Repeat as needed until the mold is gone.

For porous materials like drywall and wood, make sure to use an environmentally-safe soap or borax solution. Avoid bleach, which can stain. After scrubbing, it’s important to dry the area. Adding fans and dehumidifiers can speed up the process. You should also try to keep humidity below 50%, as mold thrives in damp areas.

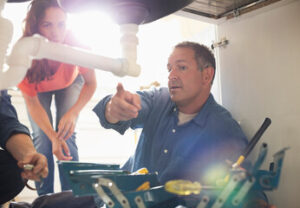
When addressing an extensive mold problem, it’s best to call in a professional. This is especially true for hidden areas, such as behind walls and in insulation. A pro can use specialized air-cleaning equipment to remove the mold and fix the moisture problem that caused it to grow.

According to the EPA, it’s typically possible to remove small areas of mold yourself, as long as the mold doesn’t cover more than a few square feet. However, it’s important to wear proper personal protective equipment (PPE) when handling mold, including gloves, safety glasses, and a N95 or P-100 respirator. It’s also recommended to seal off the affected area from unaffected areas to prevent spores from spreading.

If you’re unsure how serious your mold infestation is, a testing kit can provide a valuable diagnostic tool. These kits include a swab, a petri dish, instructions, and a mailer to send the sample away for analysis.

2. Sterilization

Mold isn’t just unsightly, but it can also destroy materials, eat away at wood and break down insulation. In addition, some types of mold are toxic and can cause a host of health problems. The key to keeping mold at bay is moisture control. This means scrubbing moldy surfaces with detergent and water, and repairing any leaks as soon as possible to prevent further problems. It’s also important to dehumidify the affected area, and clean regularly with non-toxic cleaning products.

Mold removal specialists use a variety of sterilization methods, including steam, ethylene oxide (EO) gas, and dry heat. These methods achieve an effective reduction of bacterial counts in the presence of a biological indicator. In most cases, this is measured by a minimum inhibitory concentration test.

A typical test uses a solution of known numbers of “biological indicators” that are highly resistant to the sterilization process, such as the spores from an oat strain or a bacteria culture. This is then exposed to the sterilizing agent, and the number of viable organisms is counted. The results are compared with the bioburden of the item being sterilized.

The goal of sterilization is to achieve a minimum inhibitory concentration value of 106 CFU/mL for all microorganisms, and the spores in particular. However, there are many factors that can influence how well a sterilization method works. This is why it’s important to choose a certified professional who can assess and determine the best approach for your situation.

Before a technician begins the mold remediation process, they will set up containment to keep airborne spores from spreading to other areas. They will also wear personal protective equipment such as boots, gloves and a mask at a minimum.

In addition, they will use a vacuum with a HEPA filter to remove airborne particles from the affected area. If the area is large, they may also use a portable dehumidifier to pull moisture out of the air. They will then sanitize and deodorize the affected areas using an antimicrobial or fungicide product. Then, they will use a HEPA air scrubber to clear the remaining spores.

3. Disposal

Mold and mildew are not just unsightly, they can be hazardous to your health. Inhaling mold spores can trigger respiratory problems, eye irritation and other symptoms in people who are sensitive to it. These symptoms can range from a simple cough and wheeze to fever, headaches and difficulty breathing. Those who work in construction or who are exposed to large amounts of black mold on a regular basis may experience more severe reactions.

Mold thrives in wet areas and needs two things to grow: water and a food source. Mold spores float through the air and latch onto surfaces, where they grow into colonies. Mold can grow on paper, wallpaper glue, fabric, wood, soap scum, sheetrock and many other materials. It grows faster in warm temperatures and high humidity levels.

The first step in removing mold is to determine the cause of the problem, which may involve repairing leaks or reducing humidity levels. Then, cleaning the affected area to remove any visible mold and mildew growth is done. The next step involves encapsulating the area to prevent future mold growth.

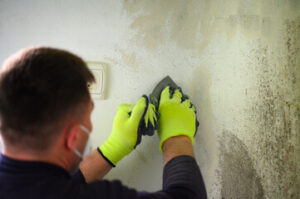
Proper mold removal requires the use of personal protective equipment, such as a face mask and rubber gloves. A misting of the affected area helps control the number of mold spores released into the air during the cleaning process. Nonporous surfaces are usually cleaned and sanitized with detergent solutions. Porous materials are often removed and discarded in plastic bags, which are then double-bagged and sealed to prevent mold spores from becoming airborne during disposal.

If you have a lot of waste from a mold removal project, hiring someone to take care of it for you may save you time and money. Companies such as 1-800-GOT-JUNK? specialize in cleaning and disposing of debris from home improvement projects, including mold cleanup. They will take care of the heavy lifting, leaving you with a clean space to get back to your daily routine.

If you suspect you have a mold infestation, a mold testing kit can help determine the type of mold in your home and how extensive the problem is. The kits typically include a swab, a petri dish, gloves and a mailer to send the sample to a lab for analysis. The results of the test will be e-mailed to you within a few days.

4. Remediation

The final step, remediation, is a comprehensive process that ensures that the mold issue is resolved and won’t return. Experts assess the moisture problem, fix it (such as a leak or improper ventilation), remove all affected materials and clean or replace them, and clear the air of spores to prevent new growth.

To begin, professionals isolate the infected area with plastic sheets and physical barriers to prevent spores from spreading. They will also use negative air pressure to keep spores from blowing around. During this step, the pros will also remove porous or absorbent materials such as carpeting and drywall. These will be disposed of properly according to environmental regulations and the experts’ guidelines. Nonporous surfaces like counters, sinks and metals will be cleaned with disinfectant sprays. The experts may also use commercial-grade antimicrobial sprays to kill spores on porous items that cannot be removed, such as wooden wall studs.

After cleaning the space, experts will apply an EPA-approved biocide to the entire affected area, killing any remaining spores and making them unable to grow back. This liquid is typically brushed or sprayed onto the surface and then left to set overnight before it can be deemed effective. The professionals will then vacuum, scrub and wipe the nonporous surfaces again to eliminate spores from the air. Finally, they will clear the air of spores with HEPA filters and other tools and equipment.

Once the air has been cleared, the professionals will perform a clearance test to ensure that the space is safe for home occupation or reoccupation. This involves testing for the presence of spores and visible mold, as well as checking for moisture levels in walls and floors. Ideally, the moisture level should be below 10% before homeowners move back in, and the professionals will verify this by visiting the home soon after the mold cleanup. In addition, the home should be inspected for any recurring water damage or moldy odors. If there is, the mold removal and remediation processes should be repeated until all signs of moisture problems have been corrected.

A Look Back at the Evolution of Plumbing

Plumbing is a complex system that serves multiple purposes like distributing water, removing waste, and heating/cooling facilities. It’s an industry that involves constant innovation and change to accommodate new technologies, skills, and customer demands.

Plumbing

Moreover, plumbers enjoy the flexibility of setting their own schedule and working as freelancers. However, they must remain aware of state-specific regulations and continuing education requirements to maintain their license. Contact Plumbing Lexington KY for professional help.

The plumbing industry has come a long way since its ancient roots. Today, it’s hard to imagine living without it. Here is a look back at the important events that have shaped modern plumbing.

The earliest plumbing systems were developed by ancient civilizations like the Romans, Greeks and Egyptians, who needed to provide public baths and toilets for their citizens. The Romans were credited with many of the early innovations in plumbing, including building impressive aqueducts that transported water from rivers and lakes into their cities.

In the 16th century, plumber began using cast iron pipes and designing water closets. These innovations were the first of their kind, allowing for the proper disposal of waste and increasing sanitation in cities and towns. This was a huge improvement over previous methods such as open ditches and cesspools.

In addition to these important developments, modern plumbing has also been shaped by material changes and environmental factors. For instance, galvanized steel pipes were popular in the United States from the late 1800s until the 1960s when copper took over. Then, during World War II, iron and steel became scarce so plumbing manufacturers started to use plastics. Afterwards, conservation laws were introduced, and it is now against the law to flush more than 3.5 gallons of water per minute.

To become a plumber, you need a high school diploma or equivalent and to undergo training through a vocational or technical school. These programs teach you the basics of plumbing and give you the hands-on experience you need to work with tools and materials. After graduating, you can pursue an apprenticeship. These can last anywhere from two to five years and will cover all aspects of the trade. After completing an apprenticeship, you will be ready to start your career as a plumber.

Valves and Pipes

Valves are one of the most important components of a plumbing system. They help to regulate water flow and pressure in a safe and effective manner. There are many different types of valves, each with its own specific functions. Valves are constructed from a variety of materials, including metals that are able to withstand high temperatures and pressure. Those that are used in underground environments may also be made from plastics for added strength and resistance to corrosion.

Pipes without valves would not be able to transport water or other fluids to and from appliances and fixtures. The valves are what allow the pipes to operate correctly, ensuring that there is an adequate amount of pressure in the system at any given time. They are also responsible for maintaining appropriate temperatures in the piping systems. Valves can be manually operated or automated, and can be actuated via an electric, pneumatic/air, hydraulic or solenoids system.

Some of the most common types of valves include pressure relief valves, ball valves, gate valves and check valves. Pressure relief valves work to relieve the excess pressure in a pipe, which can cause it to burst. They have a spring and diaphragm mechanism that can be set to limit the amount of water pressure in the pipes.

Ball valves and gate valves work by using a disc to block or allow the flow of water through them. The valve disc is attached to a stem and bore inside the pipe, which can be opened or closed by turning a handle. A gate valve, on the other hand, uses a disc that moves up and down through a spindle stem inside the pipe. This is accomplished by turning a knob at the top of the valve, which lifts or lowers the valve disc in the pipe to open and close it.

These types of valves are commonly used in residential settings for a wide range of tasks. Some of these tasks include regulating water flow, preventing backflow, and minimizing the risk of flooding. They are also useful in regulating temperature, as some of them come with built-in thermostats. The type of valve that is required for a particular task is determined by the needs of the piping system as a whole.

Plumbing and Piping

Piping is a system of pipes that transports liquids, gases and sometimes solids from one location to another within a structure. Its role is essential in industrial processes, such as oil and gas extraction, chemical manufacturing, water treatment and power generation. Without piping systems, it would not be possible to convey the vast amounts of oil and water necessary for modern life. Piping engineering is the discipline that studies the efficient design of piping systems.

There are many facets to the pipe-designing process, which requires the use of sophisticated software tools for fluid flow simulations. Piping engineers are also required to understand the principles of fluid mechanics, including the Continuity Principle and Bernoulli’s Equation. They must also take into account factors such as internal piping and valve loads, external environmental conditions, regulatory standards and cost.

The most common form of piping is found in the building industry, where it is used to carry water, natural gas, heating and cooling, and sewage. In fact, plumbing is so common that most people don’t realise that the term ‘piping’ is a specific field of engineering that encompasses a range of different industrial applications.

Pipes are constructed of a variety of materials, including copper, steel and aluminium. They can be welded, forged or cast. Other components of a piping system include flanges, fittings and valves. Valves are used to control and regulate the flow of fluids, while flanges connect the piping segments. Fittings are devices that link piping and alter their direction or shape, such as elbow joints, tees and reducers.

A piping system can also incorporate instrumentation and controls, which are often part of an industrial process. These can sense and measure the pressure, temperature and flow rate of fluids, and automatically control them. The piping and instrumentation diagram (P&ID) is the key document for describing these piping systems.

Piping design challenges include layout and routing, which involves determining the most efficient paths for fluid to travel while avoiding clashes with other equipment or structures. The piping engineer must also perform a stress analysis to ensure that the pipes can withstand operational and environmental stresses. They must also prepare piping isometrics mark-ups and specifications and coordinate with the structural engineering group to confirm support locations and loads.

Plumbing in Commercial Buildings

Plumbing in commercial buildings is different from plumbing in homes, although the basics are similar. Both involve piping to bring in clean water and get rid of wastewater, but the systems are typically larger and more complex in commercial settings. This type of plumbing is used in spaces like office buildings, strip malls, warehouses, and hospitals. Commercial plumbers work on these systems to ensure they are functioning properly.

Plumbing problems are more likely to occur in commercial settings, since there is a greater volume of water and waste being used daily. For example, in a large office building, hundreds of people might be using the same toilets, sinks, and drinking fountains on a regular basis, whereas home plumbing systems usually have only a few occupants. This means that there is a higher risk of damage to the pipes and fixtures, and it also takes longer for issues to be noticed and fixed.

In addition, many commercial properties must follow strict health and sanitation laws, which place additional demands on the plumbing system. For instance, restaurants need to have grease traps that are regularly cleaned and emptied to prevent blockages and keep the drains running smoothly.

Another issue that can affect commercial plumbing is that it is often harder to identify the source of a leak or other problem, as there are more pipes in larger facilities. For example, in a high-rise building, it can be difficult to determine where a leak is coming from in the ceiling. This can lead to significant water wastage and expensive repairs.

Because of the unique challenges that come with commercial plumbing, it is important to have a team of professionals on hand to handle maintenance and repairs as needed. In addition to commercial plumbers, these teams should include experienced building engineers and skilled property managers. These individuals can help to manage the complexities of a large building’s plumbing system, and they can also make recommendations on how to improve efficiency and reduce costs. They can also assist with ensuring that the plumbing system meets all necessary codes and compliance regulations.

Choosing a Probate Attorney Fee Structure

Probate Attorney Fort Worth helps their clients through the legal process of settling an estate when someone dies. This includes authenticating the will, distributing assets, and resolving conflicts between beneficiaries.

Probate Attorney

When selecting a probate attorney, you want to find an attorney with experience and a strong reputation. It’s also important to understand how they charge for their services.

When someone contacts a probate attorney, they have a lot of concerns – some of them financial. After all, this is a complicated process that will eat up a lot of time, so it’s understandable why many people are concerned about the cost of probate.

Fortunately, the amount that a client will have to pay depends on a few factors. These include the complexity of the estate, how long the case will last, and whether it’s contested. In addition, the experience of the attorney will also play a role. For example, more experienced attorneys are generally able to handle cases more quickly and efficiently, which can save money in the long run.

Some attorneys charge by the hour, while others charge a flat fee or a percentage-based fee. The best way to determine which option is right for you is to discuss your options with a lawyer. Ultimately, the most important factor is finding a lawyer you trust and who will work with you to manage your case.

The first step is to find a probate attorney in your area who offers a free discussion. Typically, these discussions will take about 30 minutes and are designed to help you understand your legal rights and responsibilities. The lawyer will answer your questions and explain how he or she would approach your case. You should ask your lawyer about their fees, how they bill clients, and what type of casework they usually handle.

Probate attorneys often use one of three different fee structures: hourly rate, flat fee, and percentage-based. Each has its own benefits and drawbacks, but the final decision will depend on a few things, including your budget, the complexity of the estate, and your preferences.

When it comes to determining the fee structure, the most important thing is to understand that probate attorneys are paid out of the estate being administered. This means that the executor of the estate must pay the attorney’s fees from the estate’s assets unless you are both the executor and the only inheritor. If this is the case, the attorney will be reimbursed for their expenses once the estate has been distributed to the beneficiaries.

Flat Fee

Choosing the right fee structure is an important decision to make when hiring a probate attorney. There are many factors to consider, including the complexity of the estate and the attorney’s level of expertise. However, it is essential to invest in experienced legal guidance to avoid costly mistakes and ensure that the process is completed correctly.

The most common type of fee structure for probate attorneys is hourly rates. This type of fee structure provides clients with a clear understanding of the cost of services upfront. However, it can be more expensive for complex cases, as the attorney’s time may be difficult to estimate accurately.

Some attorneys prefer to charge a flat fee for their services. This type of arrangement is often more affordable for clients, as it allows them to budget for the entire estate administration process. This arrangement is also suitable for simpler cases, such as those involving small estates with few assets.

Another type of fee structure is the contingency fee. With this type of fee, the attorney receives a percentage of the estate’s value, if it is successfully settled. This can be an attractive option for clients who want to minimize their expenses, as the lawyer is only paid if they are successful. However, this type of fee is tightly regulated and is only applicable for a limited number of cases.

Other factors that impact fees for a probate attorney include the size of the estate and the amount of debts and taxes involved. Typically, larger estates require more extensive legal involvement, which translates into higher attorney fees. In addition, complex estates with multiple property ownership structures and complex financial transactions can be more costly than simple estates.

Clients should also keep in mind that keeping their probate attorney informed throughout the process can help reduce costs. Promptly advising the attorney of any changes in the estate’s status, such as new assets or liabilities discovered or disputes among heirs, can help avoid unnecessary legal work and save the estate money. In addition, regularly updating the attorney about any communication with the court, creditors, or beneficiaries can help prevent missteps and costly delays.

Contingency Fee

Probate is an involved process that can involve complicated tax issues, estate litigation, and disputes between beneficiaries. Hiring a probate attorney can help you mediate these disputes, settle the estate, and distribute assets fairly to everyone. In some cases, a monetary settlement may even be possible. A lawyer can be particularly beneficial in a case that involves a large amount of money, such as if there are multiple beneficiaries or heirs with competing interests.

In some situations, a lawyer may charge a flat fee for their services. This type of billing can be helpful for a client because it allows them to budget their legal costs and avoid unexpected fees. For a lawyer, this is also a good arrangement because it reduces administrative work and allows them to focus more on the case at hand.

While not all attorneys take on contingency cases, those that do can provide an invaluable service to clients who cannot afford traditional hourly rates. Generally, contingency fees are limited to cases that have significant financial stakes or whose outcome can be determined at the outset.

These types of cases often include complex tax issues, disputes between beneficiaries, and challenges to a will. These types of cases require more extensive research and preparation, and a successful resolution can result in substantial compensation for the attorney.

A lawyer’s hourly rate can vary depending on how much experience they have and how complex the case is. In general, a more experienced attorney will charge a higher hourly rate than a newer attorney. This is because a more experienced attorney will know how to work a case more efficiently and will have a better understanding of what the best strategy will be.

A lawyer can also charge a retainer fee, which is an upfront payment that the attorney will then deduct from their bill as they work on the case. Retainer fees are typically used to cover filing fees, appraisals, and other miscellaneous costs. Whether you are paying your probate attorney on an hourly basis or by a flat fee, make sure to get all fees and charges in writing. This will ensure that you understand exactly how your attorney is charging for their services and can protect you from any misunderstandings in the future.

Fee Schedule

When choosing a probate attorney, you will want to discuss the fee structure and billing practices with them. Some attorneys offer a flat fee, while others charge hourly or on a contingency basis. It’s important to understand the different options so you can decide what is best for your case and your budget.

The size of the estate is a major factor in determining probate fees. A larger estate will require more legal work, which typically translates into higher attorney fees. The location of the estate also plays a role in estate fees, as some areas have higher costs of living than other areas.

Probate fees are also affected by the complexity of the estate and whether any litigation is involved. A more complex estate with diverse assets will require more time and effort from the attorney to navigate legal intricacies and ensure proper administration. This can result in higher attorney fees than a simpler estate with limited assets.

In addition, a probate lawyer may choose to charge a retainer fee, which is a lump sum up-front payment. The lawyer then deducts funds from this retainer as they perform legal work on your behalf. If the retainer runs out, the attorney will stop working on your case until it is replenished.

Finally, a flat fee for a probate lawyer is generally out of the question for any case that involves contested litigation or a will contest. This type of fee can give the client a financial incentive to push the case as far as possible, which can cause unnecessary work for the attorney and ultimately cost the estate more than it would have if the attorney had charged an hourly rate.

Comprehensive Guide to Plumbing Repair and Maintenance

plumbing

Regarding home maintenance, plumbing often remains out of sight and out of mind until something goes wrong. However, regular maintenance and timely repairs are essential to keep a home’s plumbing system running smoothly and to prevent costly disasters. This article will delve into plumbing repair and maintenance basics, offering practical advice and tips to help you keep your plumbing system in top condition. Contact your local Plumber Glendora CA for more information.

Understanding Your Home’s Plumbing System

Before diving into maintenance and repair tips, it’s crucial to understand the basic components of a home plumbing system. A typical system includes:

  1. Water Supply Lines: These are pipes that bring fresh water into your home from a municipal water supply or a well.
  2. Drain-Waste-Vent (DWV) System: This system removes wastewater and sewage from your home and vents gases to the outside.
  3. Fixtures: These include sinks, toilets, showers, bathtubs, and faucets.
  4. Water Heater: A critical component that heats water for various uses throughout your home.
  5. Shutoff Valves: These are located near sinks, toilets, and water heaters to allow for easy control of water flow.

Understanding these components helps homeowners recognize potential issues and address them promptly.

The Importance of Regular Plumbing Maintenance

Regular maintenance can prevent many common plumbing problems, extending the life of your system and saving you money in the long run. Here’s why regular maintenance is crucial:

  • Prevents Major Problems: Small leaks and minor issues can escalate into significant problems if left unattended. Regular maintenance helps identify and fix these problems early.
  • Improves Efficiency: A well-maintained plumbing system operates more efficiently, conserving water and reducing utility bills.
  • Increases Lifespan: Regular maintenance helps prolong the life of your plumbing fixtures and pipes.
  • Saves Money: Early detection and repair of plumbing issues can prevent expensive repairs or replacements down the road.

Common Plumbing Problems and How to Fix Them

Even with regular maintenance, plumbing issues can still arise. Knowing how to handle common problems can save you from costly repairs and inconvenience. Below are some typical plumbing issues and how to address them.

Leaky Faucets

A dripping faucet is not only annoying but can also waste a significant amount of water over time. The most common cause of a leaky faucet is a worn-out washer or O-ring.

How to Fix It:

  • Turn off the water supply to the faucet.
  • Disassemble the faucet to access the washer and O-ring.
  • Replace the worn components with new ones.
  • Reassemble the faucet and turn the water supply back on.

Running Toilets

A running toilet can waste hundreds of gallons of water daily. The problem usually lies with the flapper valve, which may not be sealing correctly.

How to Fix It:

  • Remove the tank lid and inspect the flapper valve.
  • If it’s worn out or damaged, replace it with a new one.
  • Adjust the chain that connects the flapper to the flush lever to ensure proper operation.

Clogged Drains

Clogged drains are a common problem in kitchens and bathrooms. They are typically caused by a buildup of hair, grease, soap scum, or food particles.

How to Fix It:

  • For minor clogs, try using a plunger to dislodge the blockage.
  • For more stubborn clogs, use a drain snake or auger to remove the obstruction.
  • To prevent future clogs, avoid pouring grease down the drain and use drain guards to catch hair and food particles.

Low Water Pressure

Low water pressure can be frustrating, especially when showering. It is often caused by a buildup of mineral deposits in the showerhead or faucet aerator.

How to Fix It:

  • Remove the showerhead or faucet aerator.
  • Soak it in vinegar for a few hours to dissolve mineral deposits.
  • Rinse thoroughly and reattach.
  1. Water Heater Issues

Water heater problems can range from no hot water to strange noises coming from the unit. Regular maintenance, such as flushing the tank annually, can help prevent issues.

How to Fix It:

  • For no hot water, check the thermostat settings and ensure the pilot light is lit (for gas heaters).
  • For strange noises, drain the tank to remove sediment buildup.
  • If the problem persists, it may be time to call a professional plumber.

Preventative Plumbing Maintenance Tips

Preventative maintenance is the key to avoiding plumbing disasters. Here are some tips to keep your plumbing system in top shape:

Regularly Inspect Your Plumbing System

Periodically check for leaks, corrosion, and other signs of wear and tear in your pipes and fixtures. Early detection can prevent more significant issues down the line.

Keep Drains Clear

Avoid pouring grease, oil, or coffee grounds down the drain. Use drain guards to catch hair and food particles, and regularly clean your drains with a mixture of baking soda and vinegar.

Insulate Your Pipes

In colder climates, pipe insulation can prevent freezing, which can lead to burst pipes and significant water damage. Insulating hot water pipes also helps retain heat, improving energy efficiency.

Flush Your Water Heater

Sediment buildup in your water heater can reduce its efficiency and shorten its lifespan. Flushing the tank annually can help prevent this.

Test Your Water Pressure

Excessive water pressure can put a strain on your plumbing system and cause leaks. Use a water pressure gauge to test your home’s water pressure and ensure it is within the recommended range (typically 40-60 psi).

Replace Old Fixtures

Old fixtures can become inefficient and prone to leaks. Consider replacing faucets, showerheads, and toilets with newer, water-saving models to improve efficiency and reduce the risk of problems.

When to Call a Professional Plumber

While many plumbing issues can be resolved with basic DIY skills, some situations require the expertise of a professional plumber. Here are some scenarios where it’s best to call in a pro:

Major Leaks or Flooding

If you have a significant leak or flooding, it’s crucial to call a plumber immediately to prevent further damage and address the root cause of the problem.

Sewer Line Problems

Issues with your sewer line, such as backups or foul odors, are complex and should be handled by a professional. They have the tools and expertise to diagnose and repair sewer line issues effectively.

Water Heater Repairs

Water heaters are complicated appliances that require specialized knowledge to repair. If your water heater is not functioning correctly, it’s best to have a professional inspect and repair it.

Persistent Low Water Pressure

If you’ve tried all the DIY fixes for low water pressure and the problem persists, it could indicate a more serious issue, such as a leak in your plumbing system or a problem with the municipal water supply.

Renovation or Remodeling Projects

If you’re planning a home renovation or remodeling project that involves moving or installing new plumbing, it’s essential to hire a professional plumber. They can ensure that the work is done correctly and up to code.

The Cost of Plumbing Repairs

The cost of plumbing repairs can vary widely depending on the nature of the problem and your location. Here are some general guidelines:

  • Leaky Faucets: Repairing a leaky faucet typically costs between $150 and $300, depending on the complexity of the repair and the cost of replacement parts.
  • Running Toilets: Fixing a running toilet is generally inexpensive, ranging from $100 to $200.
  • Clogged Drains: Clearing a simple drain clog can cost between $100 and $250. More severe blockages, especially those in the main sewer line, can be significantly more expensive.
  • Water Heater Repairs: The cost of repairing a water heater varies depending on the issue but typically ranges from $200 to $1,000. Replacing a water heater can cost between $1,000 and $3,500, depending on the type and size of the unit.

Keep in mind that regular maintenance can help prevent many costly repairs, making it a worthwhile investment in the long run.

Plumbing repair and maintenance are essential aspects of homeownership that should not be overlooked. Regular maintenance can prevent many common plumbing problems, and knowing how to address issues as they arise can save you time and money. While many plumbing tasks can be handled by a knowledgeable homeowner, there are times when it’s best to call in a professional. By understanding your plumbing system and taking proactive steps to maintain it, you can ensure that your home remains safe, efficient, and free from plumbing disasters.